Lemonway Payment Page
1. Overview
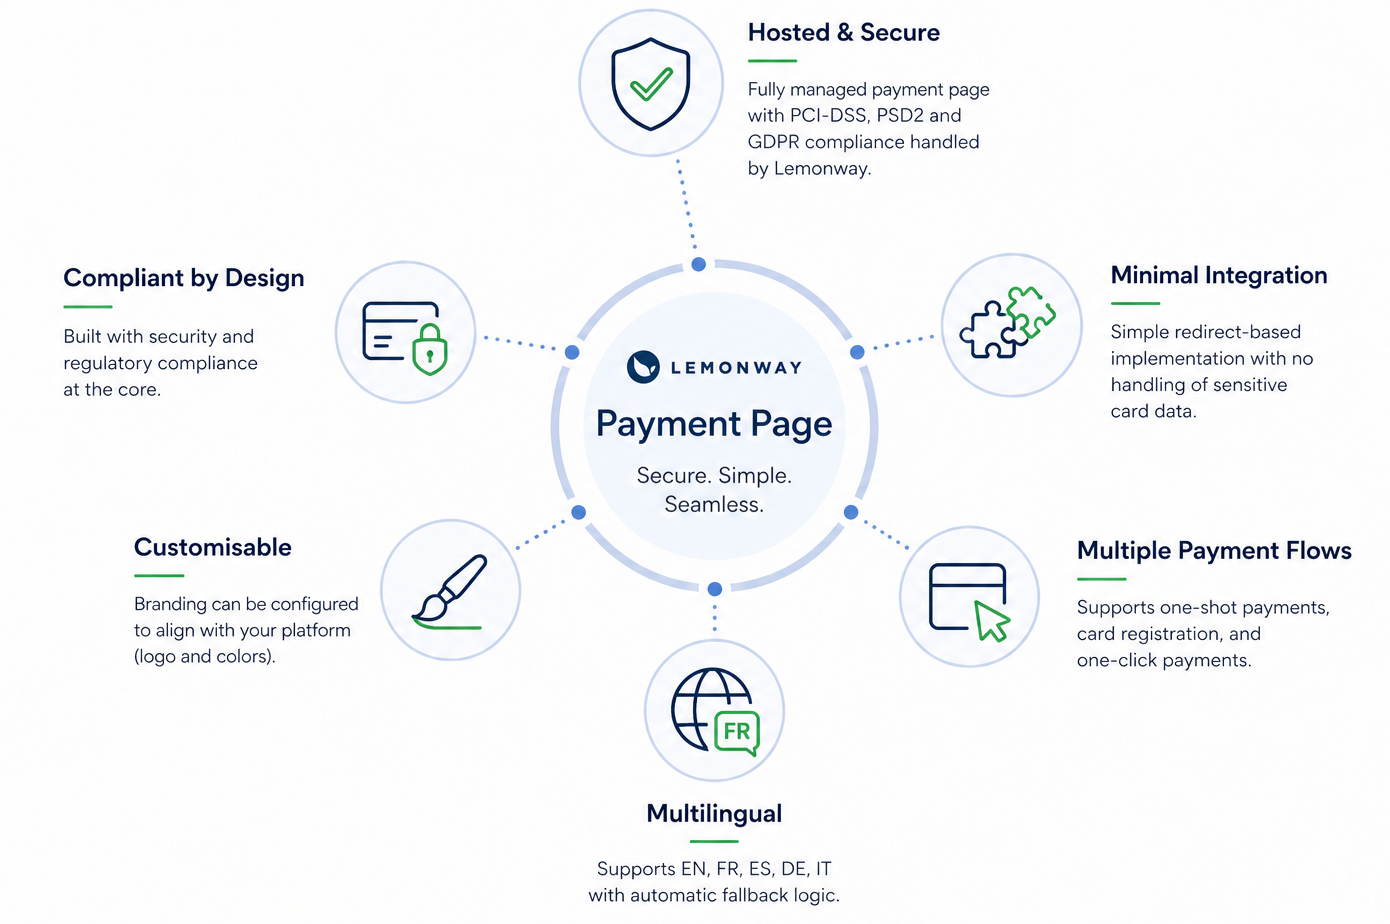
The Lemonway Payment Page is a Lemonway fully hosted card payment solution enabling you to accept payments without handling sensitive card data. It is based on a redirection model, where the end-user is redirected to a secure Lemonway environment to complete a payment.
This approach allows Lemonway to manage:
- PCI-DSS compliance
- PSD2 / 3DS2 authentication
- Secure card data processing
- Payment routing
NoteThis feature will be automatically applied to your environment. If you have any questions about the implementation, please contact your Account Manager, who can provide the necessary information.
2. Key Capabilities
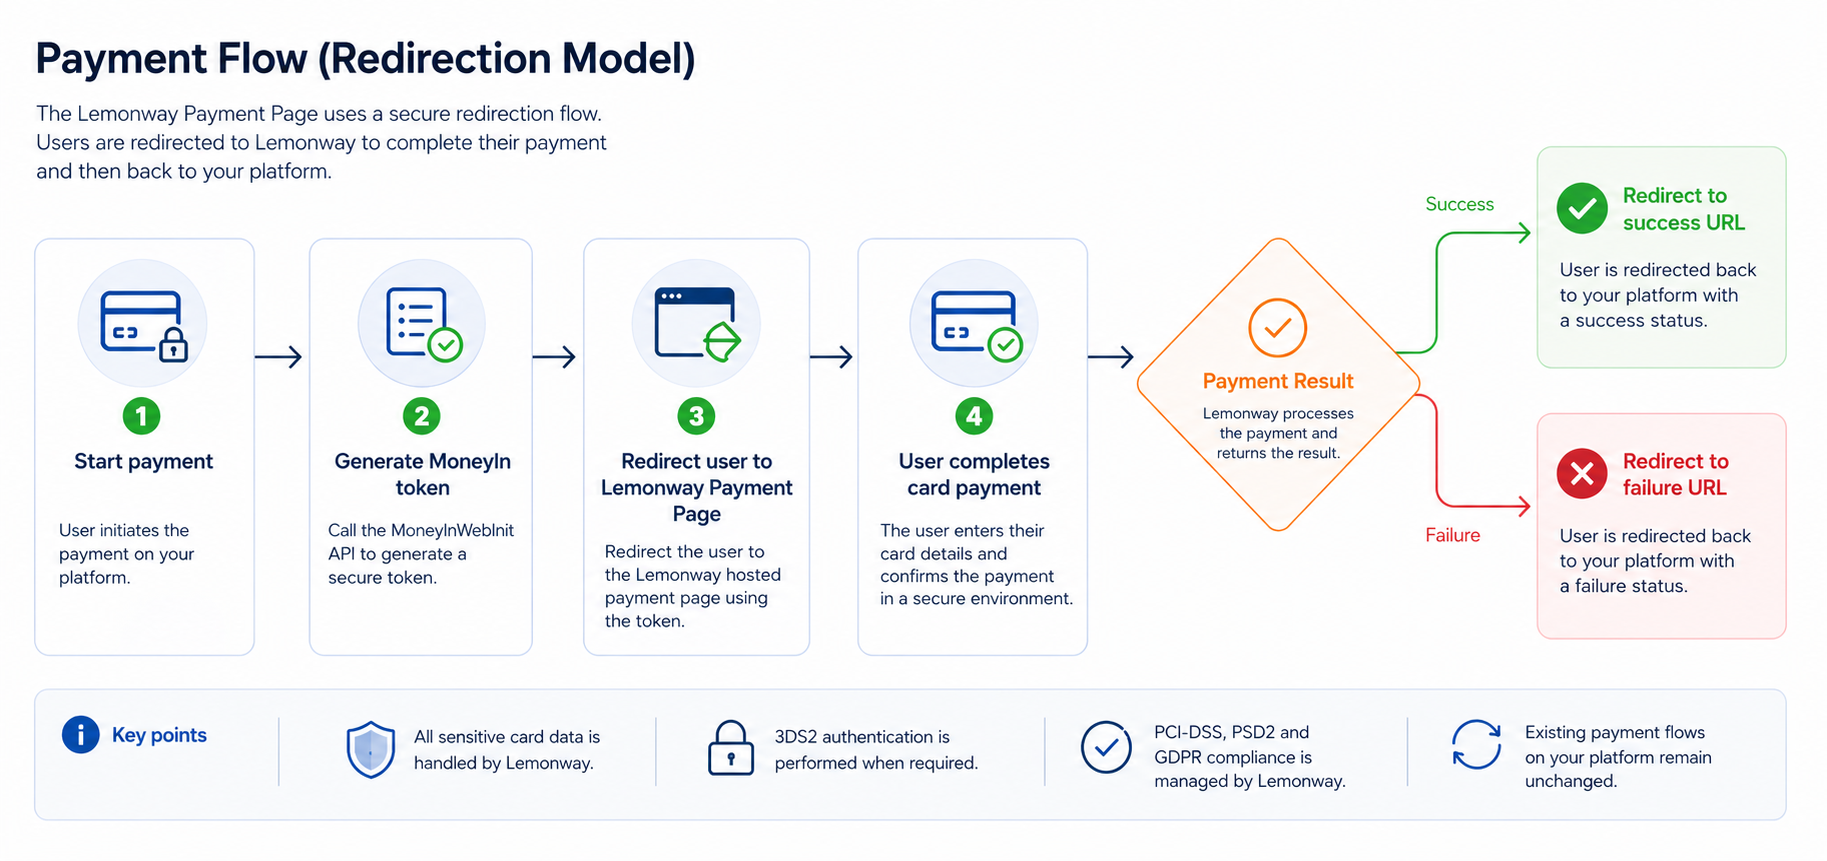
3. Redirectional Payment Flow
- The user initiates the payment from your platform
- A MoneyIn token is generated via the POST
/v2/moneyins/card/webinitend point - The user is redirected to the Lemonway Payment Page using this token
- The user enters their card details in a secure, hosted environment
- 3DS2 authentication is performed if required
- Lemonway processes the payment
- A payment result is determined (success or failure)
- The user is redirected back to your platform with the corresponding result (success or failure URL)
For further information about our payment with Cards, see the following API Initiate a Web Payment Reference page here
4. Integration
After calling the POST /v2/moneyins/card/webinit end point, you must redirect the end-user to the Lemonway Payment Page using the generated Money-In token. The redirection URL follows this format:
Production: https://webkit.lemonway.fr/mb/ENVNAME/prod/?moneyintoken=[TOKEN]
sandbox:  https://sandbox-webkit.lemonway.fr/ENVNAME/dev/?moneyintoken=[TOKEN]
Where:
| Placeholder | Description |
|---|---|
[env] | Your Lemonway environment |
[partner] | Your platform identifier |
[Token] | The Money-In token returned by the MoneyInWebInit API |
To generate the [Token], call the POST /v2/moneyins/card/webinit end point and retrieve the TOKEN value returned.
You must then insert this value into the moneyintoken query parameter of the redirection URL.
Production: https://webkit.lemonway.fr/mb/ENVNAME/prod/?moneyintoken=[TOKEN]
sandbox:  https://sandbox-webkit.lemonway.fr/ENVNAME/dev/?moneyintoken=[TOKEN]
SuccessThe end-user must be redirected to this URL to continue and complete the card payment on the Lemonway Payment Page.
5. Payment Flows
The Lemonway Payment page supports multiple payment flows depending on whether the user has a saved card.
Payment Flows with and without a saved card
5.1 One-time Payment
The Lemonway Payment Page allows the end-user to complete a standard one-time card payment, also known as a one-shot payment.
During the payment flow, the end-user can also choose to save their card for future payments. This allows them to benefit from a faster checkout experience the next time they pay.
To save the card, the end-user must select the following checkbox:

The display of this checkbox is controlled through the registerCard parameter in the POST/v2/moneyins/card/webinit end point.
| Parameter value | Behaviour |
|---|---|
registerCard: true | Displays the checkbox, allowing the end-user to save their card |
registerCard: false | Hides the checkbox, preventing the end-user from saving their card |
5.2 One-click Payment - CIT (Customer-Initiated Transaction)
If the end-user has already saved a card during a previous checkout, or if a saved card already exists in Lemonway’s back office, the Payment Page can offer a faster checkout experience using the stored card.
In this flow, the end-user does not need to re-enter the full card details. They only need to enter the CVV to confirm the payment.
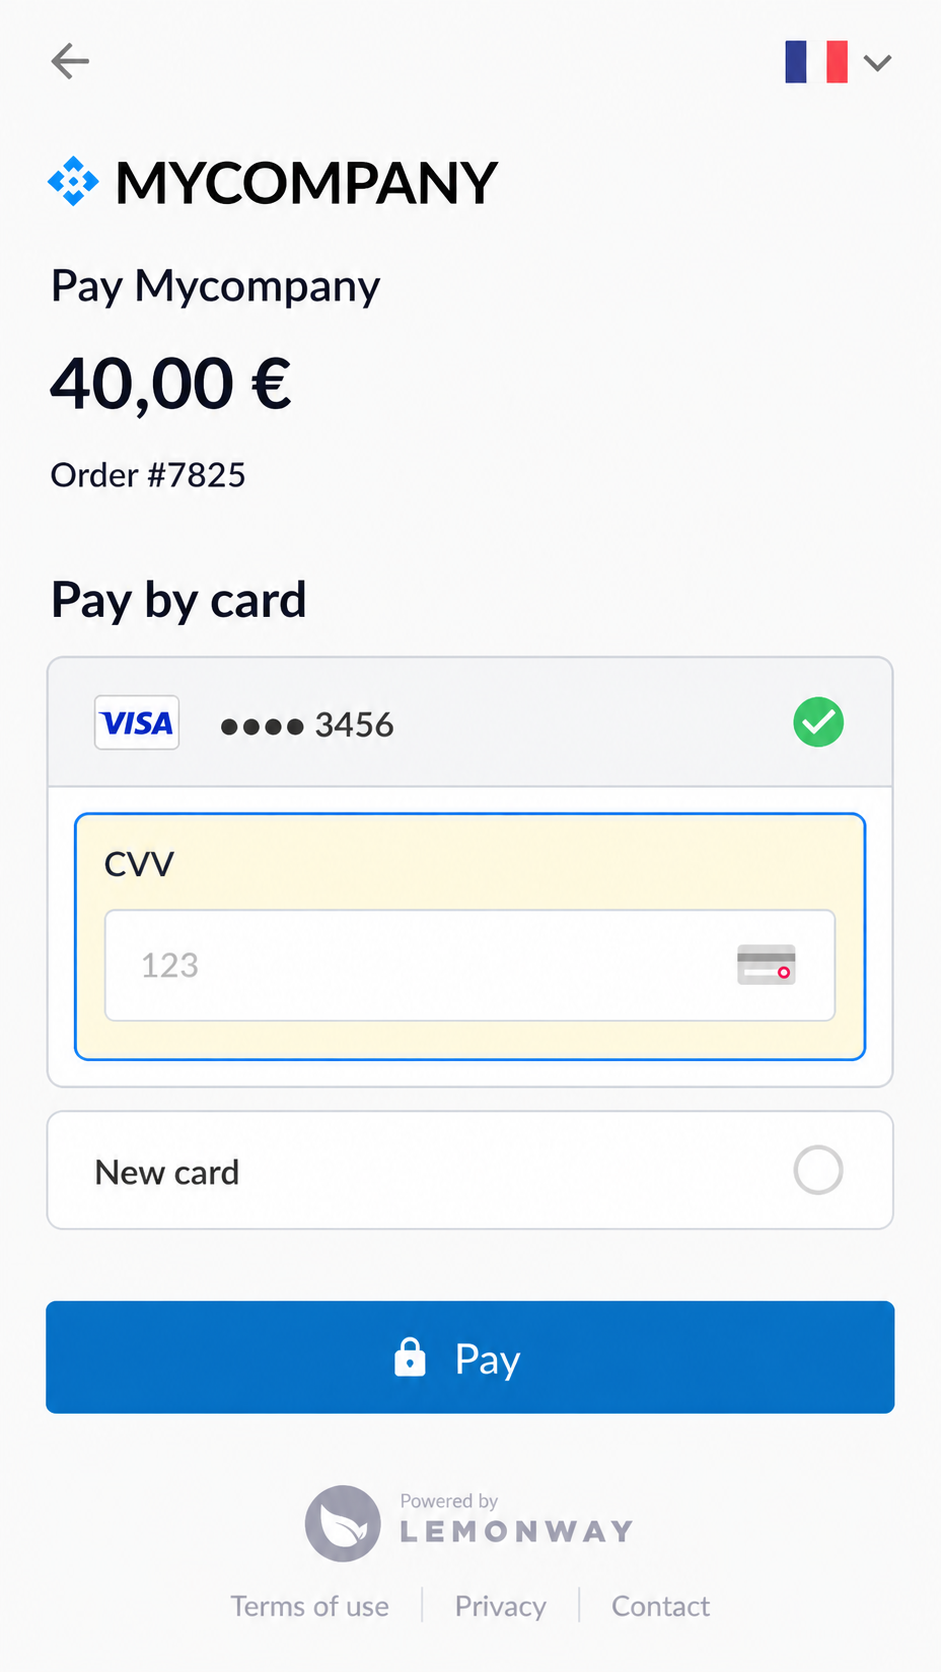
The user only needs to enter the CVV code
Even when a saved card is available, the end-user can still choose to pay with another card.
To trigger the one-click payment flow, you must provide a cardID in the POST /v2/moneyins/card/webinit end point.
When a
cardIDis provided,registerCardmust be set tofalse.
5.3 Optional: Sandbox Validation for Integration (Recommended)
Before enabling saved card payments in production, we recommend validating both flows in the Sandbox environment:
- Saving a card during a one-time payment
- Reusing a saved card for a one-click payment
This confirms that the POST /v2/moneyins/card/webinit request is correctly configured and that the Payment Page behaves as expected.
Step 1 - Register a Card
Start by initiating a standard card payment using the POST /v2/moneyins/card/webinit
{
  "registerCard": true
}
When registerCard is set to true, the Payment Page allows the end-user to save their card for future payments. Once the payment is completed, Lemonway returns a saved card identifier that can be reused for future payments.
After the payment is completed and if the end-user has decided to save the card:
- Retrieve the generated
cardId - Confirm that the saved card is available using POST
v2/moneyins/card/{cardId} - Store the
cardIdsecurely on your side if you want to reuse it later
Step 2 - Test One-click Payment with a Saved Card
Once a card has been saved, initiate a new payment using the saved cardId.
In the POST /v2/moneyins/card/webinit request, provide the cardId and set registerCard to false.
{
  "cardId": "your_saved_card_id",
  "registerCard": false
}
When a cardId is provided, the Payment Page displays the saved card to the end-user. The end-user does not need to re-enter the full card details, but they must still enter the CVV to confirm the payment.
Required URL Configuration
Make sure the following URLs are configured in the request:
| Parameter | Purpose |
|---|---|
returnUrl | Redirects the end-user to your site when the payment flow is completed |
errorUrl | Redirects the end-user to your site if an error occurs |
cancelUrl | Redirects the end-user to your site if the payment is cancelled |
This validation confirms that saved card payments are correctly supported before going live.
7. Custom Branding
Branding is configured via the Lemonway Dashboard. Use your unique access URL to start customisation, for example: https://dashboard.lemonway.com/[Your environment name]/branding/brand/about.
InfoEditing permissions are restricted to specific Dashboard roles. If you do not have one of the following roles, you will need to request elevated access:
MB-ADMIN
MB-MANAGER
MB-OPERATOR
We have dedicated documentation to help you get started; see: Lemonway Dashboard Branding.
The Branding page helps you:
- Manage who can edit branding settings.
- Customize logos, colors, buttons, links, and form styling.
- Apply branding across supported Lemonway products, including Payment Page and Online Onboarding.
- Preview changes before saving them.
- Check accessibility warnings, such as color contrast.
- Restore default branding values when needed.
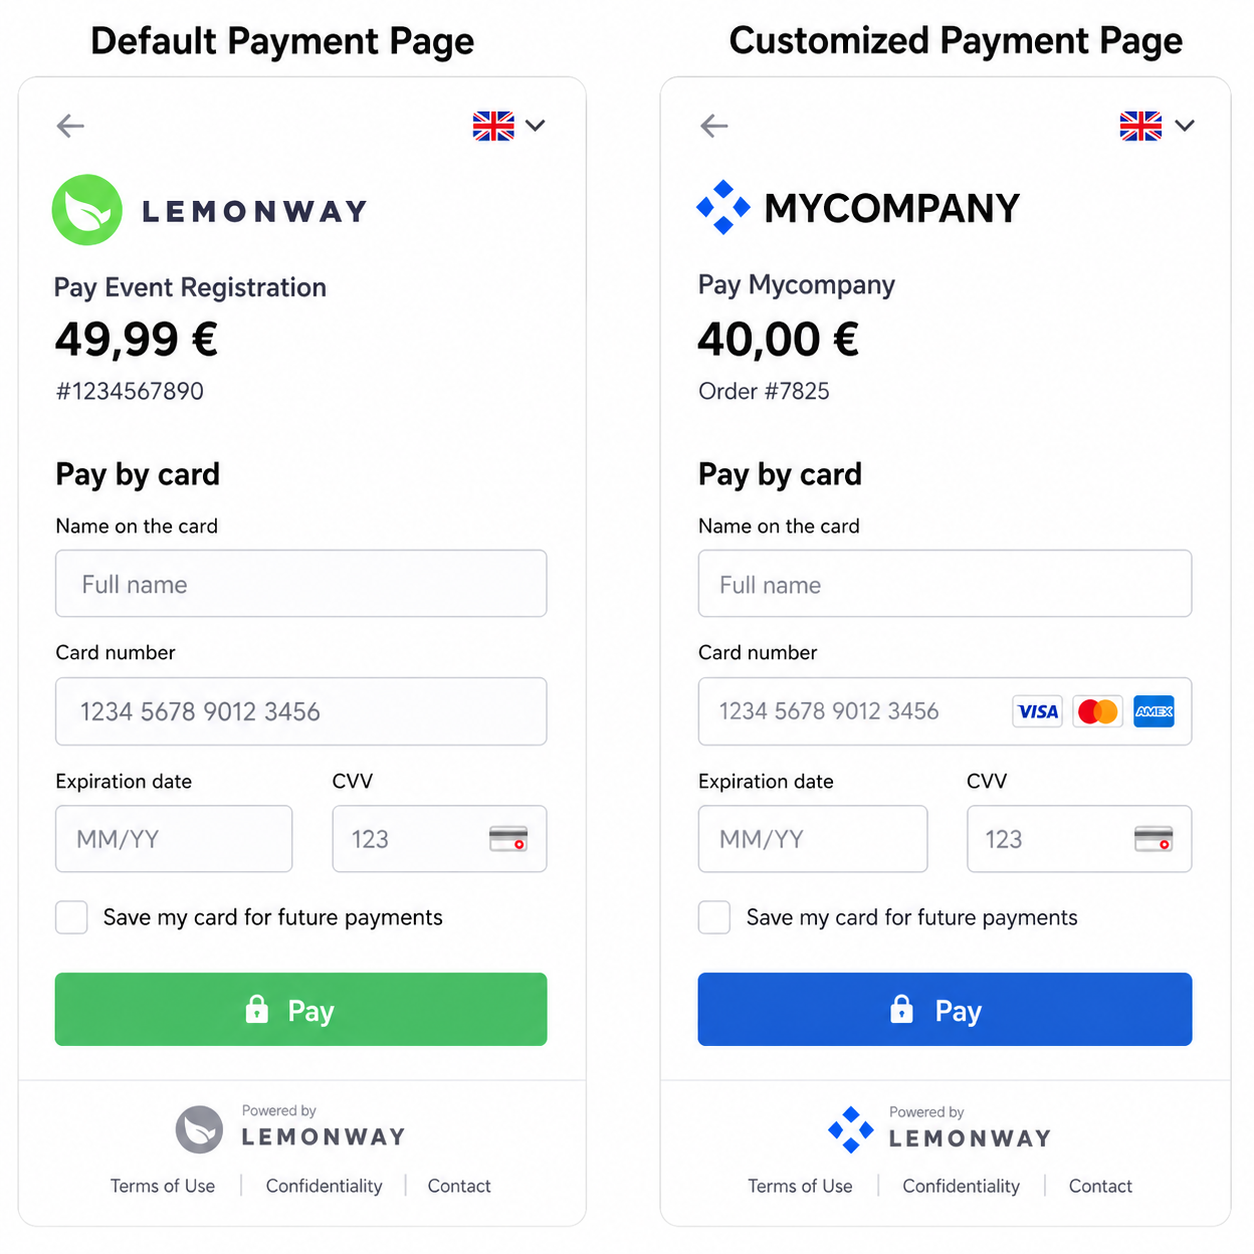
Lemonway Default Vs Customized Payment Page
NoteIf no customization is applied, the Payment Page will use Lemonway’s default branding; logo and colors.
8. Language Handling
The payer is redirected by your platform to the Payment Page with a language parameter, lang, formatted as an ISO2 language code.
Supported language codes are:
| Language | Code |
|---|---|
| 🇬🇧 English | en |
| 🇪🇸 Spanish | es |
| 🇫🇷 French | fr |
| 🇩🇪 German | ge |
| 🇮🇹 Italian | it |
The Payment Page automatically displays in the language specified by the lang parameter.
If the lang parameter is missing, invalid, or not supported, the Payment Page applies the following fallback logic:
- It uses the payer’s preferred browser language, when available.
- If the detected browser language is not supported, the Payment Page defaults to English (
en).
Payers can also change the language directly from the Payment Page by selecting the flag icon in the top-right corner.

Updated 1 day ago