This step verifies the seller’s identity and eligibility to receive payouts. For C2C platforms, KYC is a core compliance requirement and should be designed for high completion rates.
The Onboarding Object
For a C2C marketplace, Lemonway onboarding endpoints let you launch and manage the seller verification journey from your platform, so you are not starting from scratch. The main endpoint to use in our use case is the individual onboarding.
Redirect the user to the Lemonway-hosted onboarding URL shown in the response. This can be in the form of a link or button for the seller.
Add documents as requested during the onboarding flow.
Use the resume endpoint if the seller exists before completion.
Kick off identity verification
In our use case, Step 1, the Seller's profileStatus returned AWAITING_INFORMATION.
This means the account has been created, but onboarding is not yet complete.
The next step is critical before the seller can start trading.
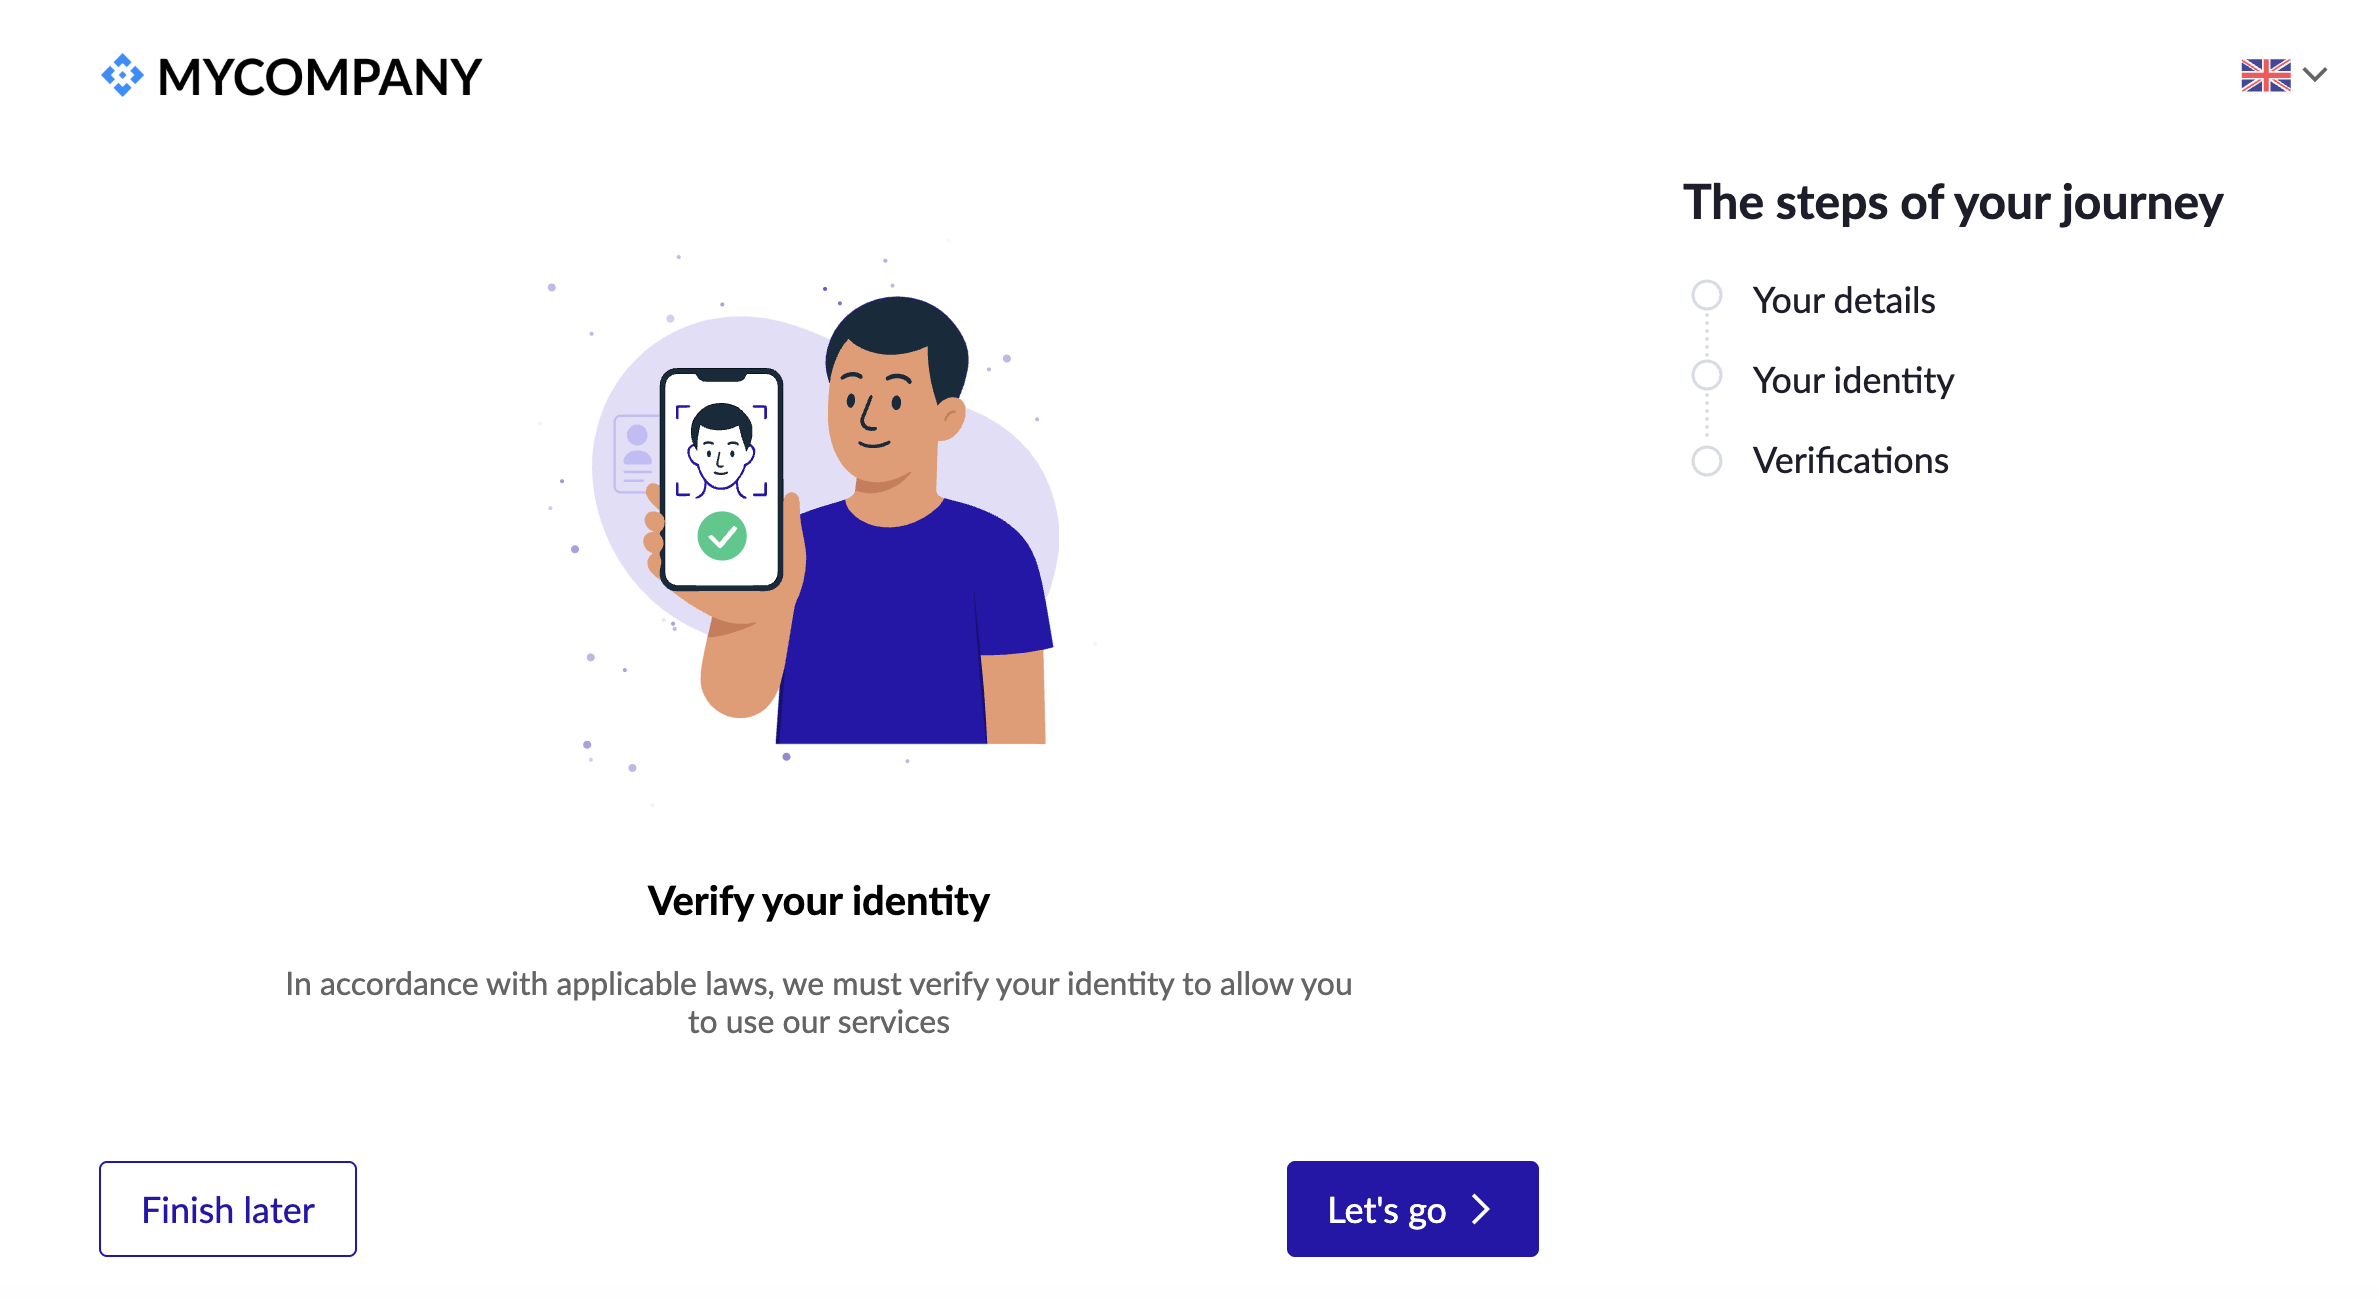
As shown in our conceptual flow in Step 1, the seller must click the button to begin verification (the onboarding process).
What happens next?
When your platform calls the endpoint for creating an individual onboarding, the API returns a JSON response containing a unique onboarding URL, which is our verification button in our use case.
When calling this endpoint, you need to submit the seller's data, along with the accountId Lemonway returned. Everything else is optional. Lemonway collects data directly from the seller during onboarding.
POST https://onboarding-api.lemonway.com/onboardings/individual
This URL is a link to Lemonway’s hosted onboarding platform. Your platform redirects the seller to this URL so they can complete their KYC (Know Your Customer) process, upload documents, and provide identity details in a secure environment. The process auto-saves as they go, and they can leave and come back at any point without losing progress.
In our use case, the seller has completed step 1, and now they need to click the button to start the verification. This links to the Lemonway onboarding interface.
Conceptual View 2: The Seller's Journey - Start Onboarding
Steps for individual onboarding
Which documents does the seller need to provide?
For an individual to pass KYC, Lemonway requires the following core documents. The seller will be asked to provide these documents during the onboarding flow:
A valid ID document for the individual
Proof of address (if requested during the flow)
👍
Accpeted Languages
We accept KYC documents in French, English, Spanish, Italian and German. For other countries, we require an official translation in one of the above listed languages.
Depending on your Issueing country, we will ask your seller to provide accepted documentation for the target country. For example, the following documents are accepted in France:
National ID
Passport
Residence Permit
📘
Note
In some cases, Lemonway may request additional documents. All documents must be legible, undamaged, and not expired, blurry, pixelated, or cropped submissions will be refused.
The marketplace seller will also be asked to provide a likeness, and for this process, they must have access to a smartphone.
To verify their ID, the seller requires a smartphone camera
👍
Lemontip
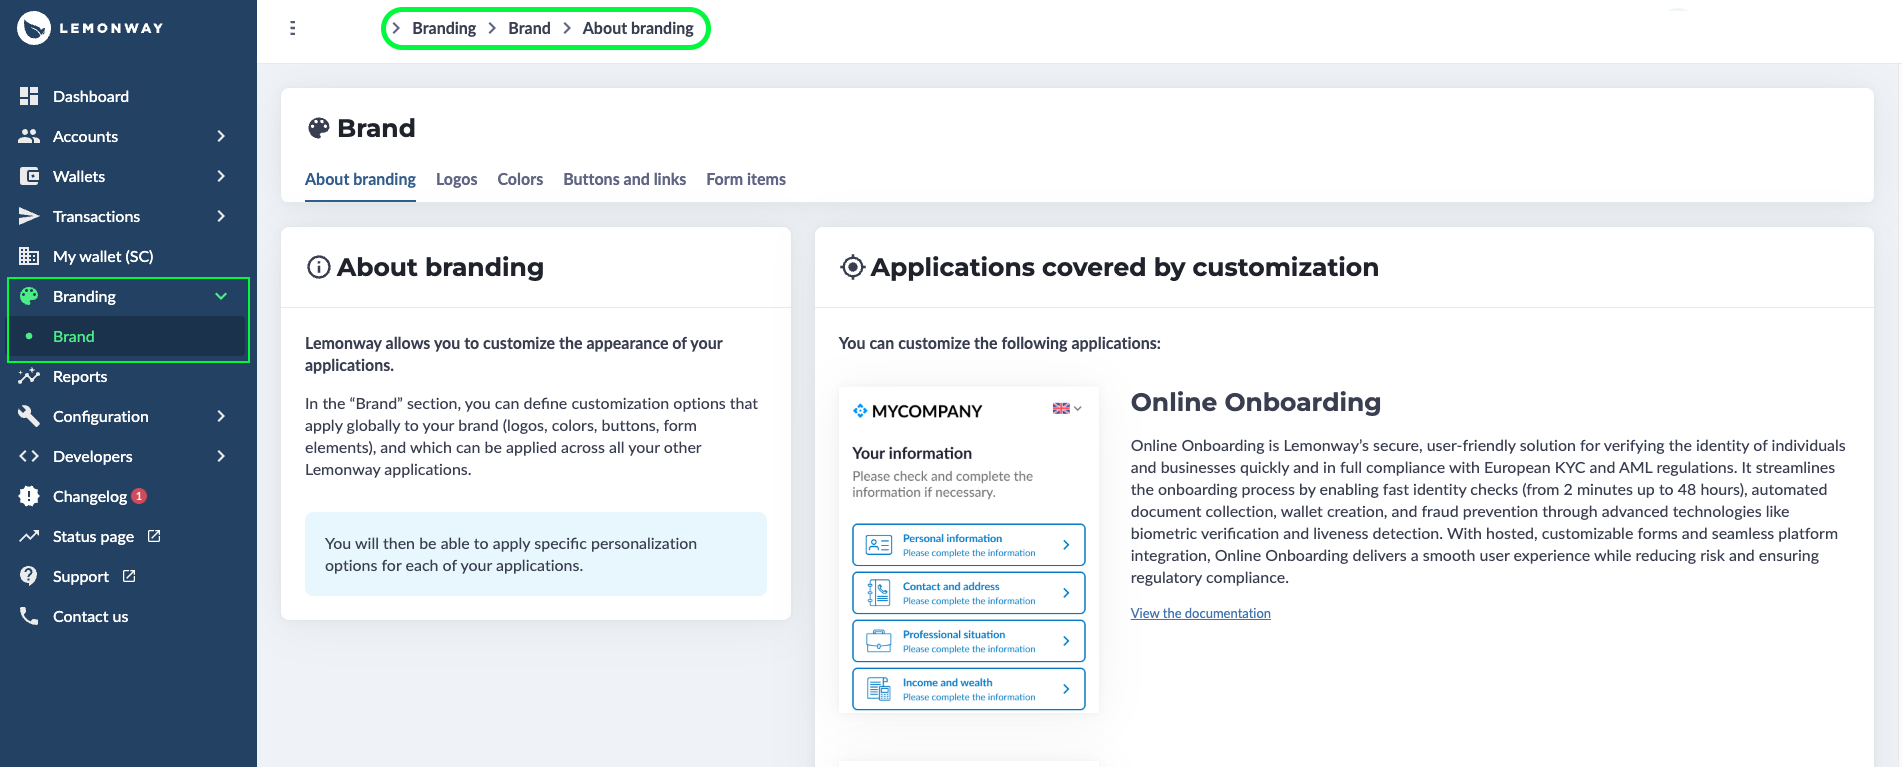
You can rebrand the Online Onboarding interface with your platform colours, your company logo, buttons and links from the Dashboard. See: Onboarding Branding
Branding: Online Onboarding in Lemonway Dashboard
📘
Note
The average oboarding is between 24hrs to 48hrs. During this time the seller is able to create a catalog of good / services however they should not be allowed to start selling.
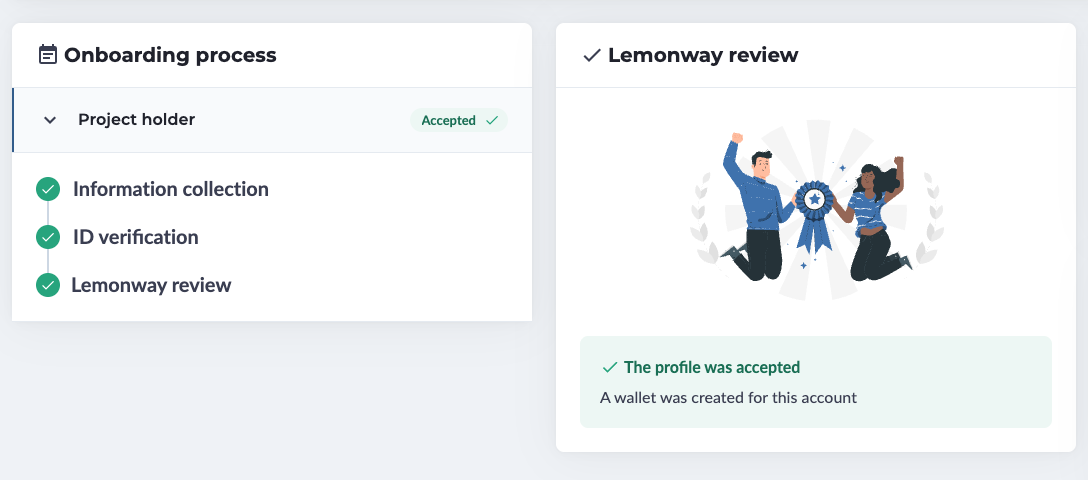
Seller approved - wallet is ready
Once verification passes, two things happen automatically:
You will receive a webhook when the account status changes to ACCEPTED. This is visible in the Dashboard profile name.
A wallet is created and linked to the seller.
The good news is that the seller can now receive funds, meaning that they are officially open for business on your marketplace platform.
Dashboard view - Profile accepted and wallet created
Setting up a Seller's bank account API
To request a Pay-Out on a payment account, the payment account must first be linked to a bank account.
Step 1 Register the bank account details
Provide the seller's bank account details using POST:/v2/moneyouts/iban end point.
Register the main IBAN for the payment account.
Optionally register an additional bank account if needed.
Step 2 — Upload the proof of IBAN
Upload a supporting bank document using the POST: v2/accounts/{accountid}/documents/upload..
For proof of IBAN, use document type 2.
Validation requirements
The following rules apply for validation:
The bank account holder must match the payment account holder.
For individuals, only the individual's bank account is accepted.
The document must clearly show:
account number / IBAN
account holder full name
bank name or logo
Accepted documents include:
Proof of IBAN / bank account document
Bank statement
Digital bank screenshot (if all required fields are visible)
KYC review
KYC review is typically completed within 48 hours.
Checks performed:
The account number submitted via API matches the one shown on the proof.
The payment account holder matches the bank account holder shown on the proof.
👍
Information
Keep the account holder name exactly as it appears on official bank records to avoid KYC mismatch.
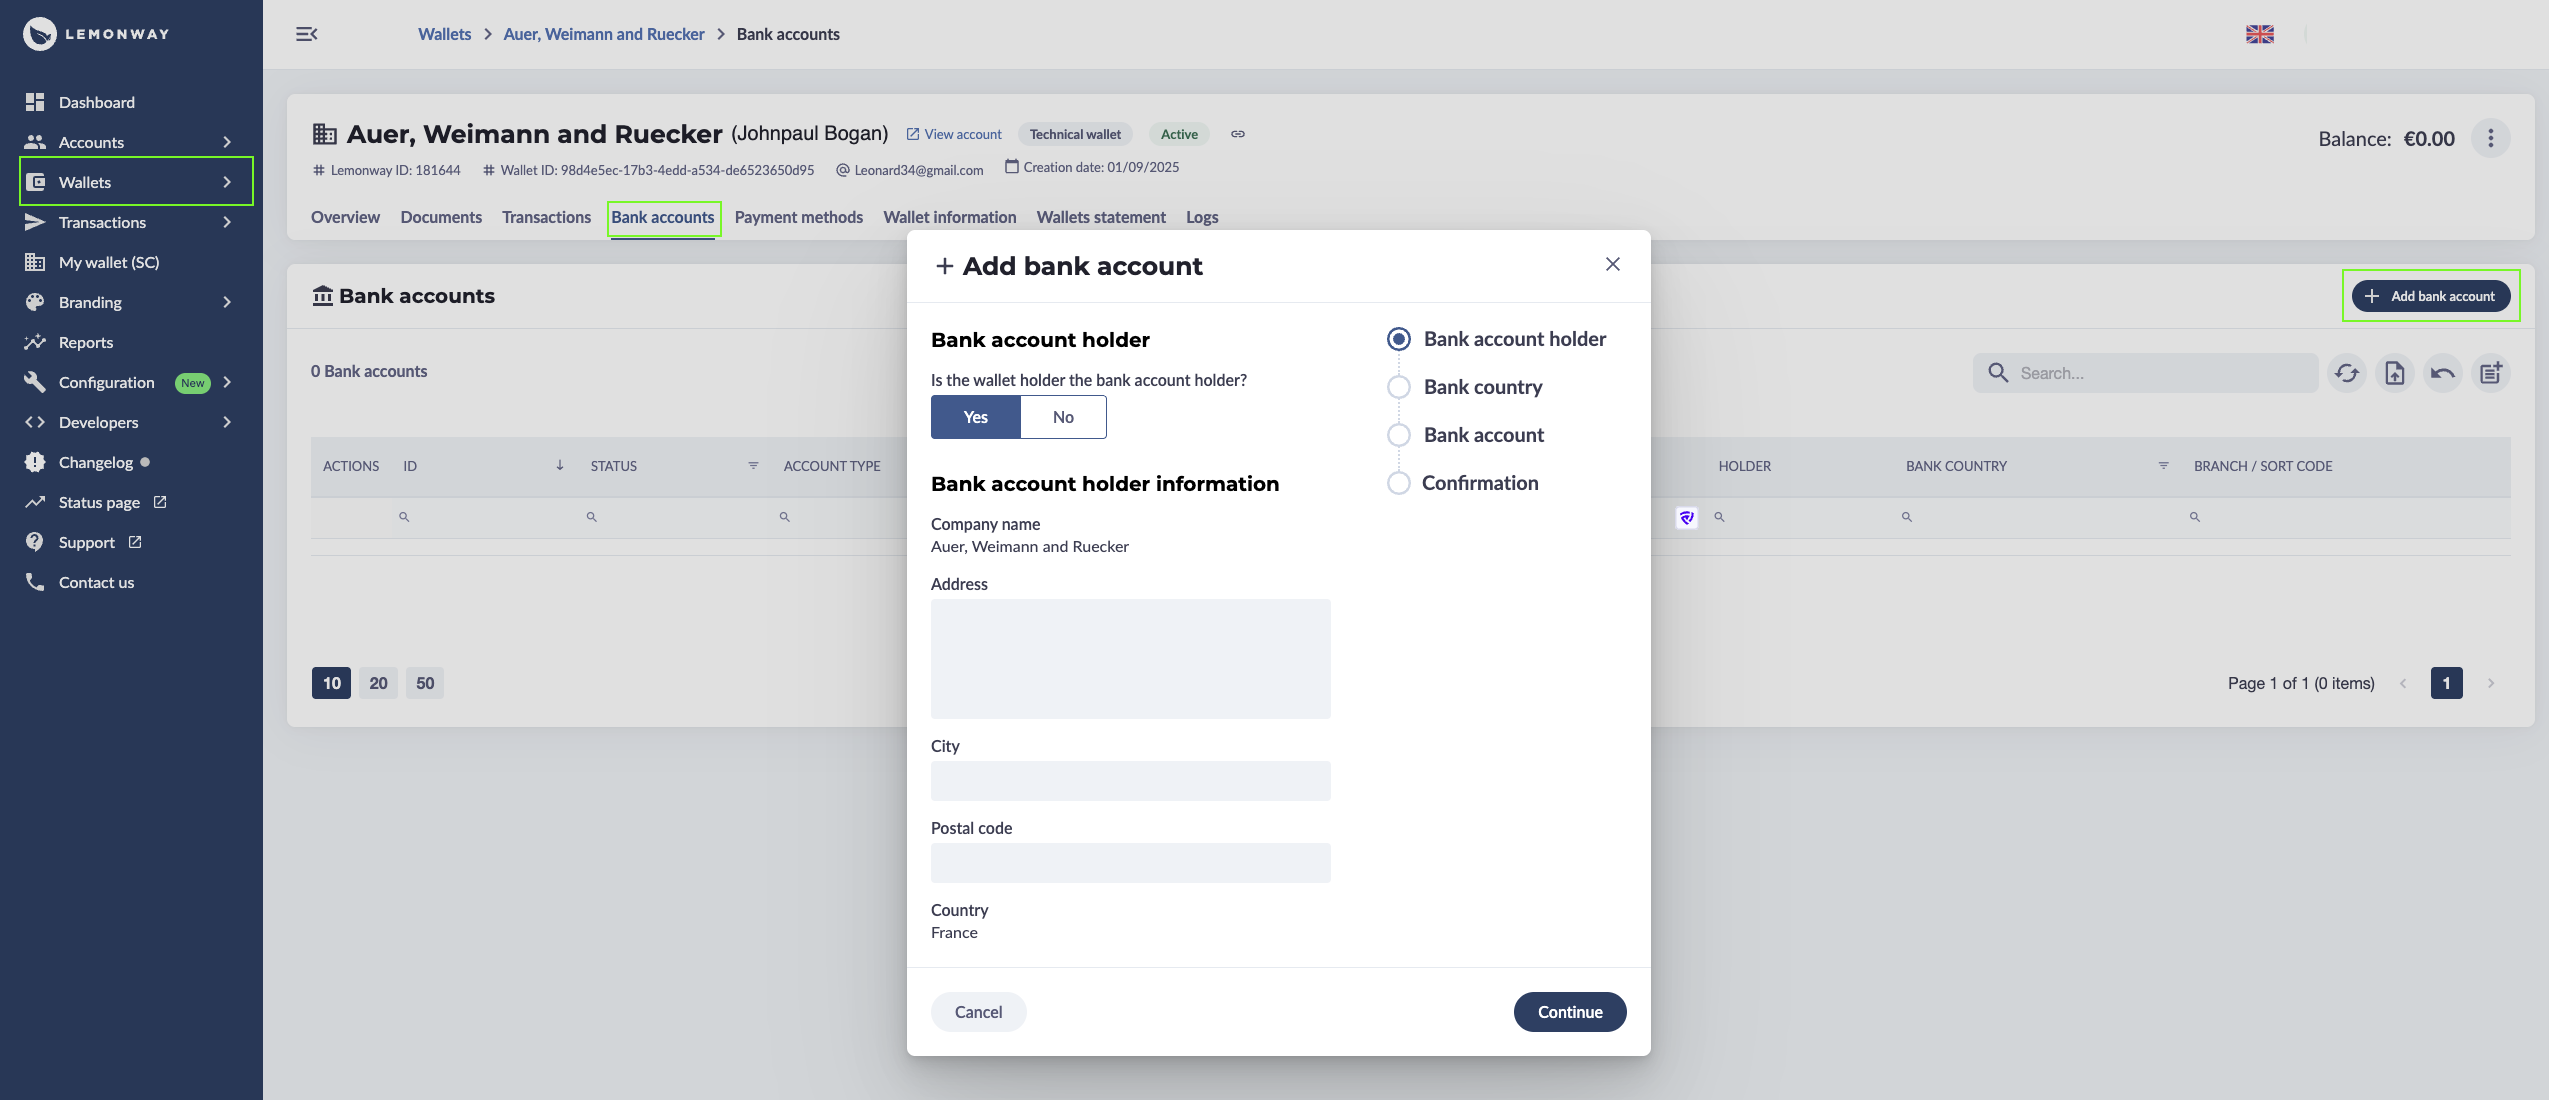
Setting up a seller's bank account in the Dashboard
To add a bank account in the Lemonway Dashboard, do this:
Go to Wallets in the left menu.
Open the target wallet/entity.
Click the Bank accounts tab.
Click + Add bank account (top right).
Then complete the wizard:
Step 1 — Bank account holder
Choose whether the wallet holder is also the bank account holder (Yes/No).
Fill in holder details (name, address, city, postal code, country).
Click Continue.
Step 2 — Bank country
Select the country where the bank account is held.
Click Continue.
Step 3 — Bank account
Enter bank details (typically IBAN/account number, BIC/SWIFT, account type, and any local fields like sort code/routing if requested).
Click Continue.
Step 4 — Confirmation
Review everything.
Confirm to create the bank account.
Adding a Seller's Bank Account
After saving, the account appears in the Bank accounts list for that wallet. The bank account still has to be reviewed by our KYC team?.
Step 5 - Upload Bank account documents
To upload documents related to the bank account, go to the Documents tab on the seller's wallet page:
Click the Add Documents button.
Select 2 Bank Statements from the menu.
Upload the related documentation.
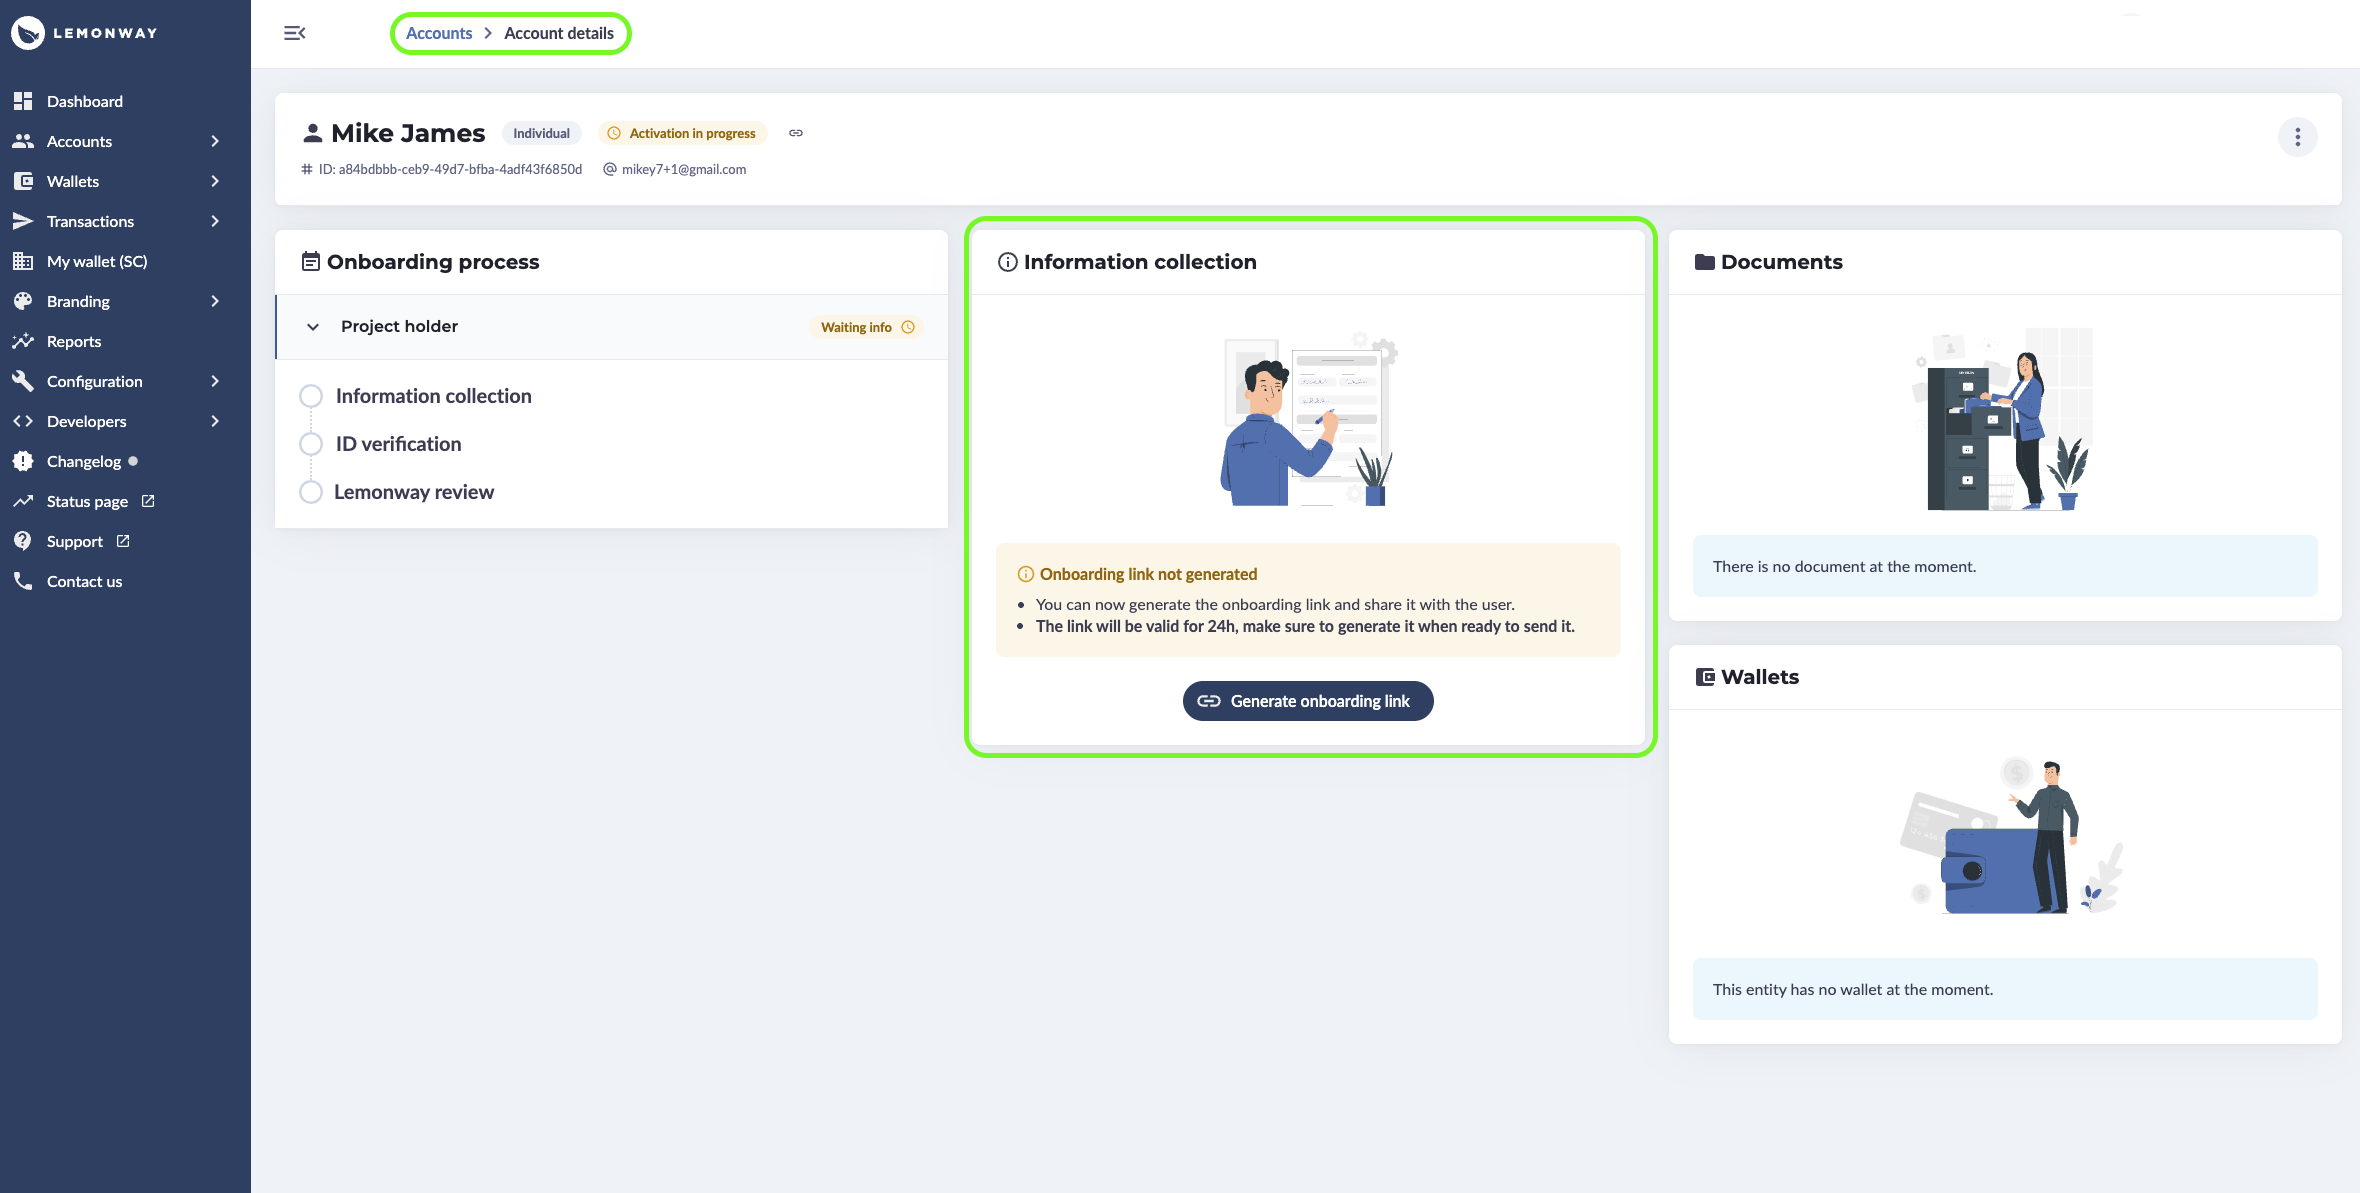
Onboarding Link: Using Lemonway Dashboard
To generate an onboarding link via the interface, you must first create an account. Creating an account via the Lemonway Dashboard is straightforward and is the easiest way to get started in your environment.
However, you should really only use this method if you are creating a small number of accounts and have not yet industrialized the account creation process on your platform. You will require specific information for the individuals for whom you are creating the account.
Sign in to your account.
Click Accounts.
Click Accounts list (this will display all accounts in your environment).
Click Create Account and select the account type you want to create from the list.
After completing the account creation form, you will be prompted with the option to create an onboarding link immediately. Alternatively, you can use the Account List: Navigate to the Accounts List table, click on the specific Account ID, and select the option to create a link from the account details page.
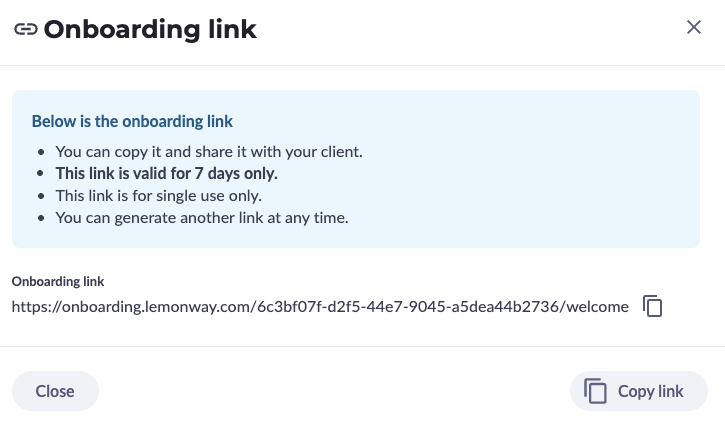
Create an Onboarding link from the Lemonway Dashboard
Onboarding link created in Lemonway Dashboard
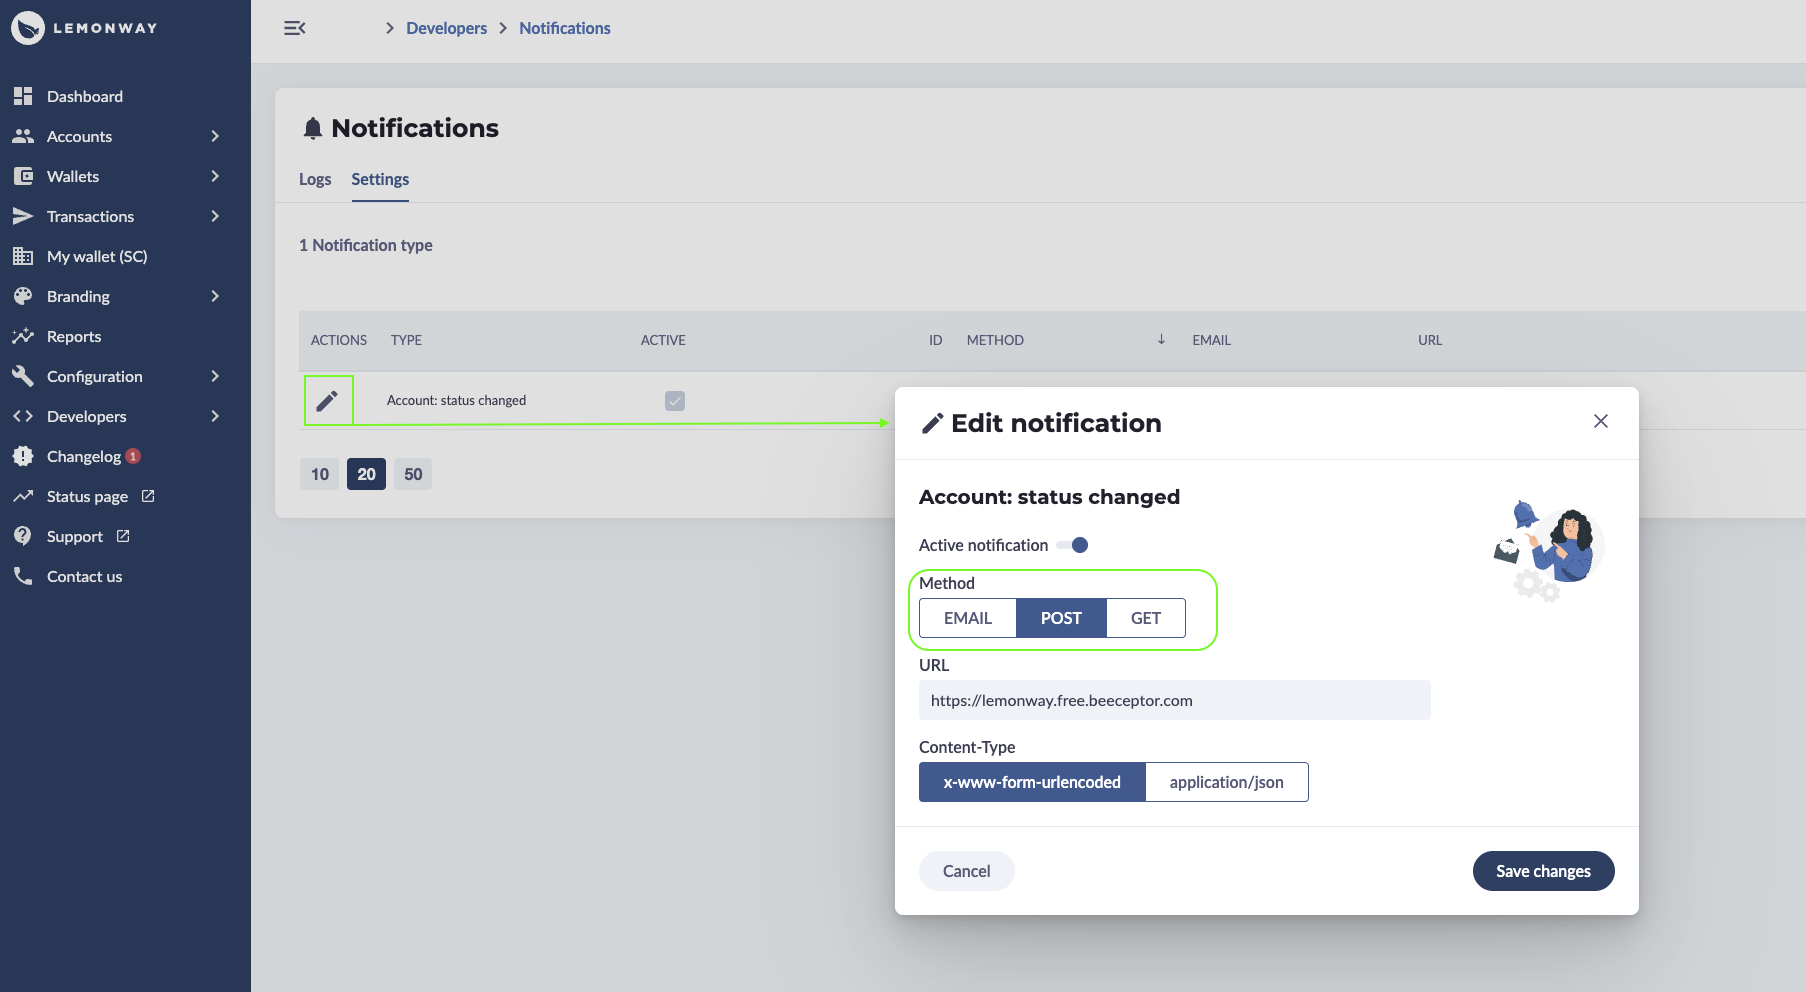
Onboarding Webhooks: Using Lemonway Dashboard
A dedicated page explains how to set up Account and Onboarding webhooks here. These can be configured in your environment from the Lemonway Dashboard.
Two important webhooks:
Webhook Event ID: 49 for Account creation and status updates
Webhook Event ID: 50 for Onboarding Profile Statuses
Implementation Steps
Set Up Webhooks: Configure webhook endpoints to receive notifications for both account and profile status changes.
Handle Notifications: Implement logic to process different notification types and update your systems accordingly.
Monitor Status Continuously Regularly check account and profile statuses to ensure onboarding is progressing as expected.
👍
Lemontip
Enable these notifications in the Dashboard to receive all required account and document
updates for your end users.
Delivery options include: email (HTML) or webhooks/callbacks (HTTP POST or GET).