PayPal Smart Button Integration
PayPal Smart Button
Javascript SDK Integration
To implement the smart button and other customizable features you need to use the PayPal SDK. The SDK Integration lets you define content based on the data that is passed. There are several parameters that can be defined, for example, buyer currency, buttons, messages and hosted fields.
Smart Button Code Example
The code example demonstrates the Lemonway x PayPal solution front-end implementation. To help you get started as quickly as possible use the code description to help with your implementation.
We have created a recipe with descriptions to guide you through the PayPal Javascript SDK implementation. Check out the code example demo [here]
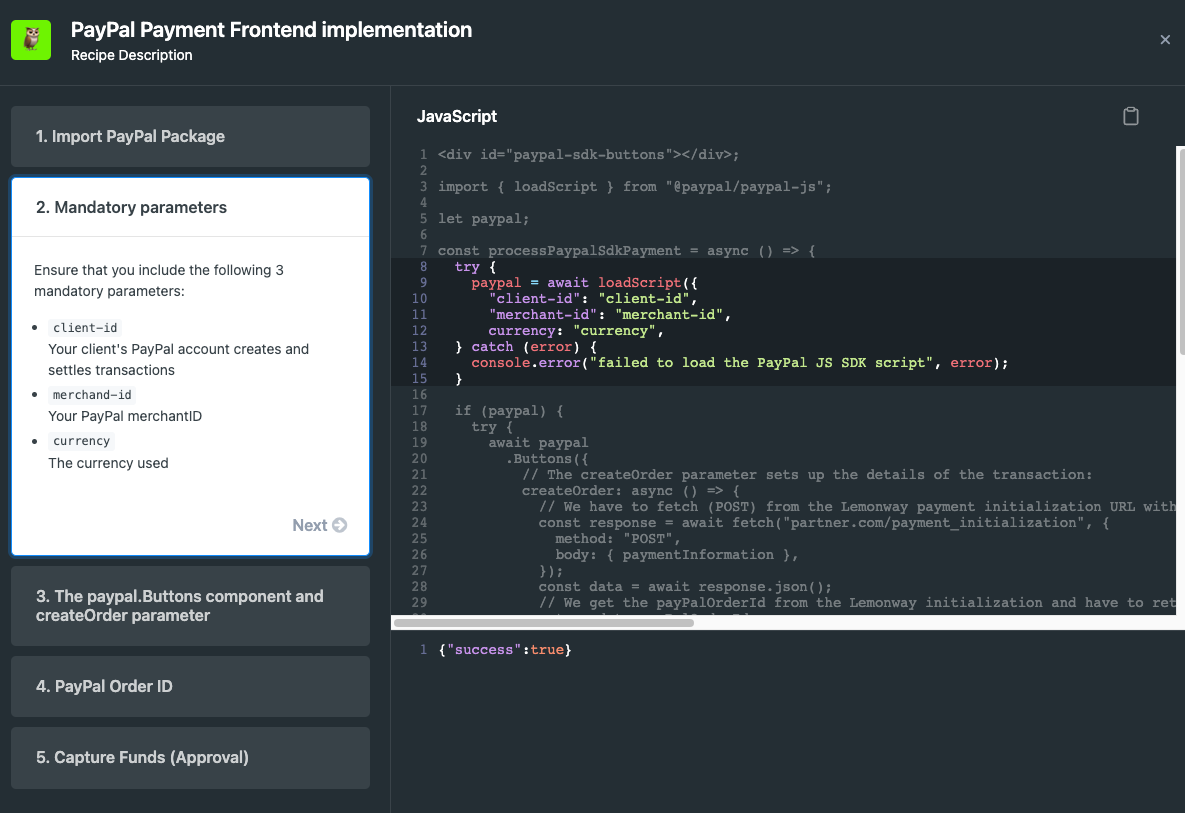
NoteIf you are interested in Lemonway's PayPal solution and would like to see a demo, contact your Implementation Manager.
PayPal "Smart Button" SDK Workflow
To employ the SDK method you will be required to implement two Lemonway calls:
The following workflow shows how a transaction is handled when the PayPal JavaScript SDK is integrated into your platform. The resume call is used only when the PayPal JavaScript SDK method is implemented.
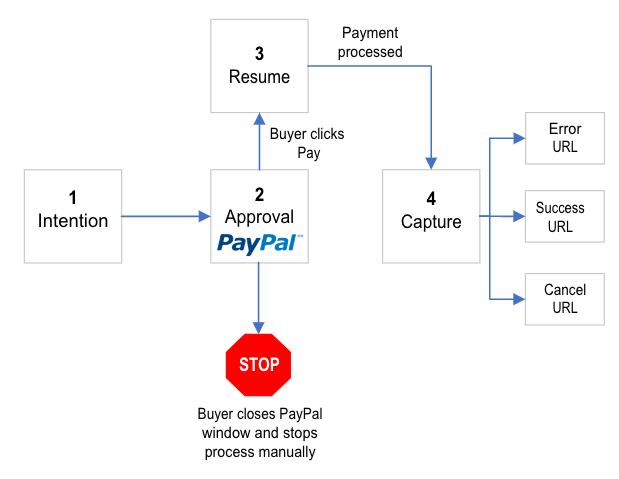
Step 1: Intention
This step represents the transaction purpose. Are the funds captured immediately, or at some later date? The default mode is set to Capture funds immediately.
Step 2: Approval
From a background task perspective, the payment process is paused. The payment does not continue until the buyer clicks the pay button.
Buyer Stops Payment Manually: STOP
It is possible at this stage that the buyer cancels the Payment and closes the PayPal window manually.
Step 3: Resume
The Resume action is activated if the buyer has approved (clicks Pay) the transaction. This action informs Lemonway that the buyer has approved, and the payment process can proceed.
Step 4: Capture
The payment is Captured at this point and a redirection is provided according to the payment status.
returnUrlin case of success.cancelUrlin case of cancellation.errorUrlin case of error.
Required endpoint
POST /webservice/v2/moneyins/paypal/init
- Request: Several Parameters and body (mandatory).
| Body | Object |
|---|---|
| redirections | returnURL |
returnURL | |
cancelURL | |
| transaction | accountId |
totalAmount | |
| delivery (receiver) | Receiver: full name |
Address mandatory only if an item(s) is a physical type.
| |
| items | merchantAccountId |
description | |
quantity | |
unitAmount | |
type (digital or physical) |
- Response:
id,payPalOrderId, andredirectionUrl
Required endpoint
POST /webservice/v2/moneyins/paypal/{transactionId}/resume
- Request: In the Parameters the
transactionIdis required. - Response:
id,payPalOrderId, andredirectionUrl
Example:
Customized parameters - PayPal window displaying various payment messages and options.
Buyer Journey
To initiate PayPal, implement the POST /v2/moneyins/paypal/init call to receive a redirection URL to redirect your end-user to PayPal.com. They will then be able to finalize their payment.
This is a commonly used implementation.
- The buyer adds items or services to the shopping cart.
- They view the items in the cart and then click Pay.
- You offer the PayPal option and the end user clicks the PayPal button.
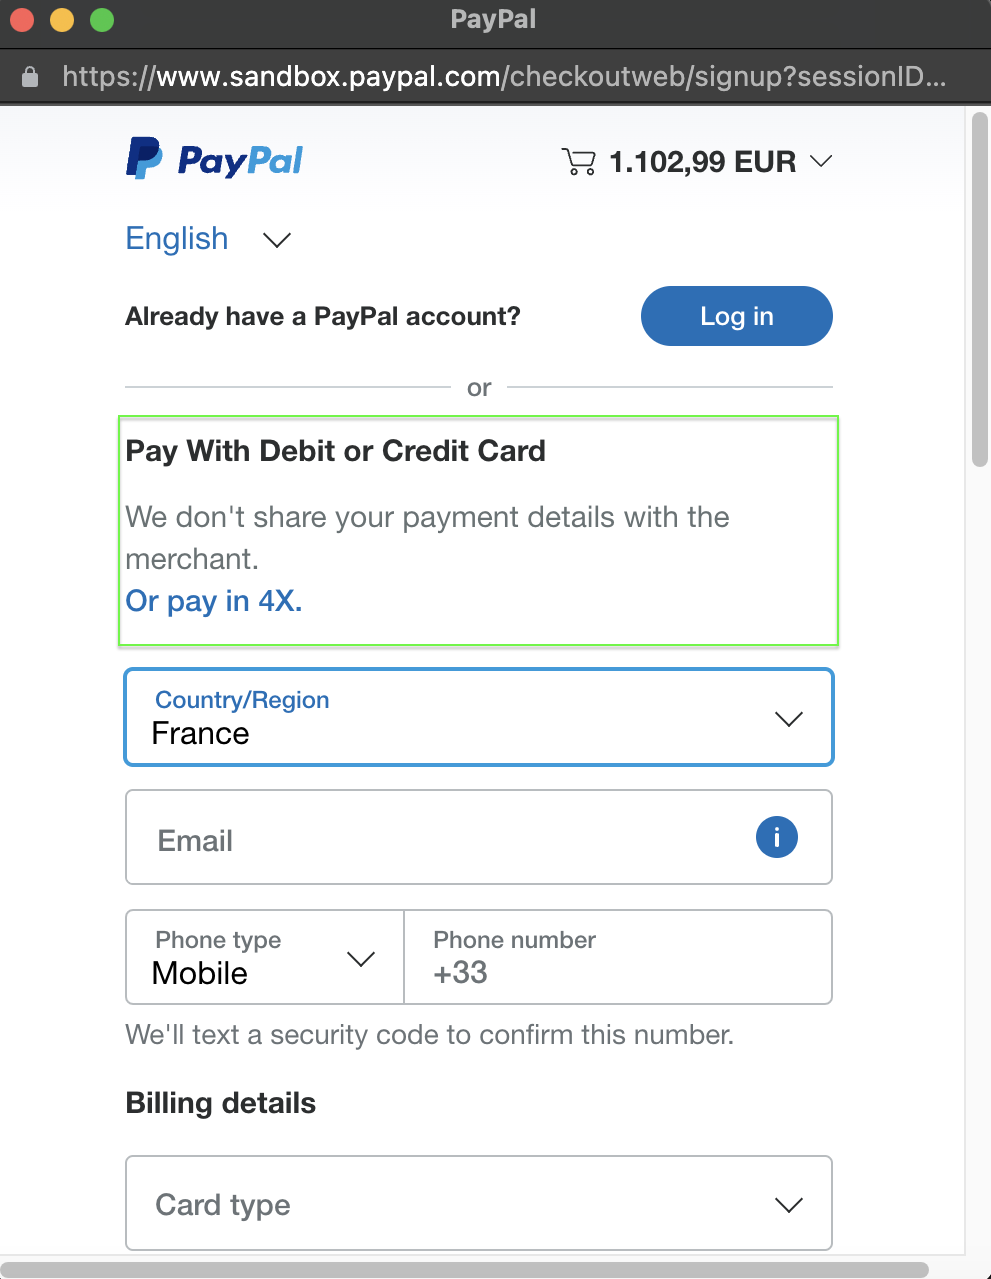
- They are redirected to PayPal.com to log in to their account.
Once logged in they finalize the payment and are redirected.
The URLs listed below must be publicly accessible so your end user and our webkit server can send requests to them.
returnUrl- redirects to the successful transaction page.
cancelUrl- redirects to the canceled transaction page.
errorUrl- redirects to an error page.
PayPal loginThe buyer will have to log in to their PayPal account to finalize payment.
Languages
PayPal lets you incorporate different languages for payments. For more information consult 👉 here
Updated 10 days ago